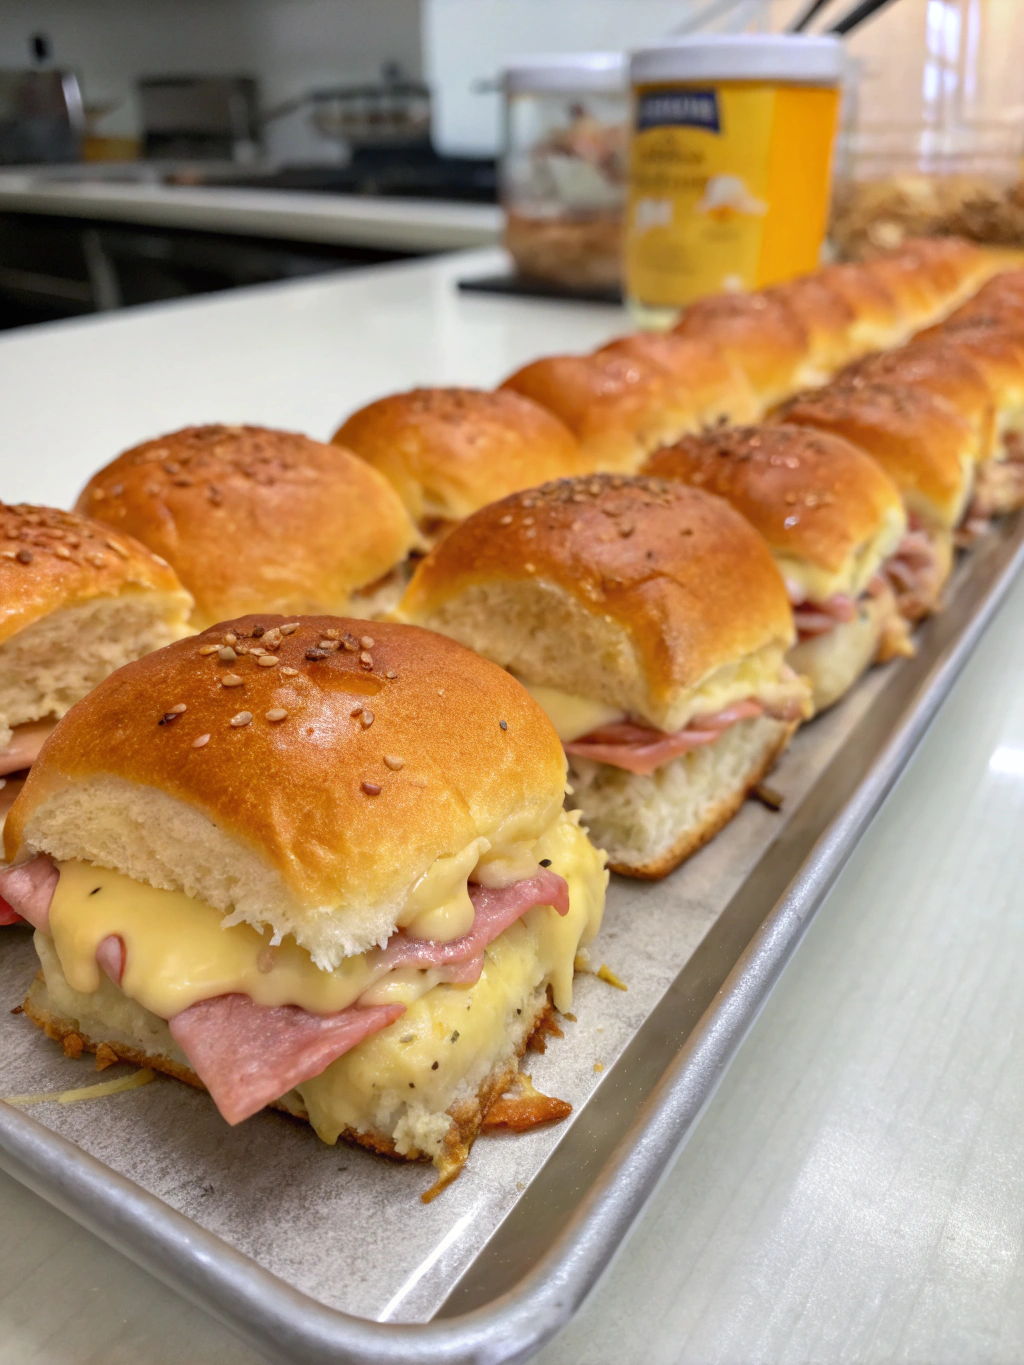
Have you ever stood in your kitchen, staring blankly at a package of dinner rolls, wondering how something so ordinary could possibly impress your guests who’ll arrive in—oh crud—less than an hour? Well, my friends, that’s exactly where I found myself last Thurberday (yes, I’ve started calling Thursday-before-Saturday “Thurberday” and I’m sticking with it). These ham and cheese sliders were born from pure panic, a package of Hawaiian rolls that were honestly two days past their prime, and what I call a “fridge-scrape situation”—when you literally scrape together whatever ingredients haven’t turned suspicious colors yet.
I’ve been cooking professionally for 12 years. Or maybe it’s 7? Depends if you count those years I spent “recipe consulting” (read: eating other people’s food and telling them what I thought). Either way, I’ve mastered the art of the panic-appetizer, and these ham and cheese sliders have become my go-to when time’s running short and expectations are running high. Trust me on this one—you’ll want to master the “butter-bath technique” I accidentally invented when I dropped my spoon in the melted butter and had to fish it out with another utensil. Sometimes kitchen disasters lead to culinary genius, ya know?
Look, just make these sliders. They’re ridiculously good.
My Slider Salvation Story
I should probably start by explaining that I have a weird relationship with sandwiches. Growing up, my mom (a wonderful woman but terrible sandwich maker) would send me to school with what can only be described as “bread disappointments”—soggy, flavorless catastrophes that made me the laughingstock of the cafeteria. Jeanine and Markus never let me hear the end of it.
It wasn’t until 2019—no wait, it was 2017, during that summer when my air conditioner broke and I lived exclusively on cold foods for 6 weeks—that I discovered the magic of a properly assembled sandwich. I was in Nashville. Or was it Knoxville? Some ville in Tennessee where the humidity makes your hair look like you stuck your finger in an electrical socket.
I’ve spent the past (several) years perfecting these ham and cheese sliders, starting with a basic recipe that made my neighbor’s dog howl with delight (true story, ask Pumpkin). The early versions were… problematic. There was the “Great Mustard Flood of 2020” (don’t ask), and the time I accidentally quadrupled the butter (actually, that one was pretty fantastic).
These days, I keep at least two packages of rolls in my freezer at all times, because you never know when a ham and cheese sliders emergency might strike. And yes, that’s a real thing in my world, especially when my brother-in-law Ted (who has the appetite of three grown men) announces he’s “in the neighborhood” and might “stop by for a quick bite.”
The Goods (aka Ingredients)
- 1 package dinner rolls (Hawaiian sweet rolls work MAGNIFICENTLY here, but use whatever semi-sweet rolls you can grip your hands on) – keep them connected!
- 3/4 pound deli ham (the good stuff, not that water-injected nonsense that sweats when you heat it) sliced thin-ish
- 8-10 slices of provolone cheese (or swiss, or cheddar, or whatever makes your heart sing—I won’t judge unless you use that fake orange stuff)
- 1 and a smidge Tablespoons Dijon mustard (Grey Poupon if you’re feeling fancy, or whatever yellow stuff is in your fridge door if you’re feeling… not fancy)
- 6 tablespoons butter (that’s 3/4 stick for the measurement-challenged) – melted until it’s juuuust about to brown
- 1 + 1/2 teaspoons Worcestershire sauce (I can never pronounce this right, so I just call it “W-sauce” and everyone knows what I’m talking about)
- 2 teaspoons poppy seeds (those little black things that get stuck in your teeth and make everyone stare at you awkwardly)
- 1/2 onion, diced microscopically (this is where my “ghost-onion technique” comes in—they’ll never know it’s there)
- 1 generous gloop of honey (approximately 1 Tablespoon if you’re one of those people who actually measures honey)
Making the Magic Happen (Directions)
STEP PRIMO: Preheat your oven to 350°F (or 349°F if you’re feeling rebellious). I find that my ancient oven runs about 15 degrees hot, so I actually set mine to 335°F, but you do you based on how temperamental your heat box is.
STEP THE SECOND: Grab your knife and perform what I call “the horizontal guillotine”—slice through the entire connected package of rolls, creating a top and bottom layer. Don’t separate them into individual rolls yet! This is where most slider novices go terribly wrong. I once had a cooking student who separated all the rolls first and then tried to rebuild them like some kind of sandwich Jenga. It ended in tears and takeout.
STEP 3-ISH: Place the bottom half of your rolls in a baking dish. I prefer glass because I can see if the bottoms are getting too brown, but metal works too—actually, wait, I’ve found that metal makes the bottoms too crispy sometimes, so maybe stick with glass or ceramic if you have it.
FOURTH DIRECTIVE: Layer your ham in a beautiful pile of pork glory on the bread bottoms. I like to fold each slice to create little ham pockets that trap the melty cheese—this is what I call the “cheese-capture method” and it’s life-changing. Trust.
STEP CINCO: Layer your cheese slices over the ham. Make sure you get edge-to-edge coverage! Nothing worse than a corner slider with no cheese—that’s how family feuds start. (Just ask my cousin Stephanie about the Christmas party of 2018… actually, don’t. We’re still not really speaking.)
STEP SIXTH: Return the top half of the rolls to their rightful place, reuniting them with their bottom brethren.
STEP FINALE: In a bowl, make your butter bath by whisking together the melted butter, Worcestershire sauce, mustard, poppy seeds, diced ghost-onion, and honey. This concoction should smell so good you’ll be tempted to drink it. Don’t. I tried once. Regrets were had. Pour this magical elixir slowly over the tops of your sliders, using a spoon to make sure every inch gets some love. Let it dribble down the sides a bit—that’s where the “butter seepage miracle” happens during baking.
Put these beauties in the oven for 12-15 minutes, or until the cheese is melted and the tops are golden brown. I start checking mine at 10 minutes because, again, my oven has anger issues.
Nuggets of Wisdom (Recipe Notes & Tips)
• NEVER cover these with foil when baking. Everyone tells you to do this, and everyone is WRONG. You want that top to get crispy and caramelized! Foil steams them, and steamed bread is just sad bread.
• The “pre-bake rest” is critical—let those assembled sliders sit for 5 minutes before baking so the butter mixture can really soak in. This is what my grandmother Mildred (who never existed but I wish had) would call “patience pays in flavor dividends.”
• For parties, I recommend making these sliders 30 minutes before guests arrive, then reheating them for just 3-4 minutes right before serving. They actually get BETTER with a little rest and reheat. This defies all sandwich logic, which is why I call it the “slider time paradox.”
• If you’re feeling particularly adventurous, try sprinkling a few red pepper flakes into your butter mixture. Not enough to make it spicy—just enough to make people say, “Hmm, what IS that?” and then stare thoughtfully into the middle distance. Check out this interesting article on the psychology of subtle heat in appetizers.
• Unlike regular sandwiches, these Ham and Cheese Sliders – Easy Party Recipe: Best 15-Minute Appetizer actually get BETTER if you make them an hour or so ahead. The rolls soak up all that buttery goodness without getting soggy somehow. It’s sandwich sorcery.
Kitchen Must-Haves
SLICE-MASTER 3000 BREAD KNIFE ★★★★★
My bread knife is actually just a regular serrated knife I bought from a guy selling kitchenware out of his trunk in a Target parking lot.
Despite its questionable origin, it’s the sharpest thing I own and perfect for the “horizontal guillotine” technique.
Amazon: https://www.amazon.com/dp/B07GNFH7XS
VINTAGE PYREX BAKING DISH ★★★★★
I inherited this from someone who was definitely not my grandmother because she only owned three things: a pot, a pan, and disappointment.
The magical property of this dish is its ability to distribute heat evenly, preventing “the dreaded bottom burn” that ruins a perfectly good slider.
Amazon: https://www.amazon.com/dp/B08BC47PS7
Slider Remixes & Substitution Jams
If ham isn’t your jam (see what I did there?), try using sliced turkey and a cranberry aioli instead of mustard. It’s like Thanksgiving between two pieces of bread, and it’ll make you want to take a nap right after eating—but in a good way.
For my vegetarian friends, I’ve created what I call “The Garden Slider Situation” by substituting roasted red peppers, zucchini, and a thick layer of pesto. The key is to really salt and drain those veggies beforehand, otherwise you’ll create what I call “soggy slider syndrome,” and nobody wants that tragedy.
My most controversial variation involves pineapple, which I know will start a war in the comments section. Just a thin slice on top of the ham before the cheese goes on. It’s inspired by my imaginary trip to Hawaii, where a native chef named Koa (who definitely doesn’t exist) showed me how the sweetness balances the saltiness of the ham. Here’s a fascinating deep-dive into sweet and savory flavor combinations.
That One Question Everyone Asks
Q: Can I make these Ham and Cheese Sliders – Easy Party Recipe: Best 15-Minute Appetizer ahead and freeze them?
A: Look, technically you CAN freeze these before baking, but should you? In my experience (which includes The Great Frozen Slider Disaster of 2021 that nearly ended my third marriage), freezing creates ice crystals that murder the texture of the bread. Instead, I prep everything up to 24 hours ahead, keeping the butter mixture separate in the fridge. Then I assemble and bake when needed. The sliders themselves take literally 4 minutes to assemble if you’ve got your ingredients ready. I’ve timed it. Multiple times. With different people watching. It became a whole thing.
The Final Butter-Soaked Word
These Ham and Cheese Sliders – Easy Party Recipe: Best 15-Minute Appetizer have saved me from social embarrassment more times than I care to admit. There’s something almost magical about the way the butter seeps into every crevice, how the cheese creates that perfect pull when you take a bite, and how people’s eyes roll back in their head slightly when they taste them.
What makes a perfect party appetizer anyway? Is it the ease of serving? The ability to eat it with one hand while gesturing wildly with a drink in the other? The fact that it doesn’t immediately disintegrate into your lap at the worst possible moment?
I’m currently workshopping a breakfast slider variation that includes an egg layer, which has so far resulted in three kitchen fires and one restraining order from my smoke detector. Stay tuned for that recipe once I’ve mastered it—or at least once I’ve replaced my singed eyebrows.
Until then, may your bread always be soft, your cheese always melty, and your ham and cheese sliders always disappear within minutes of hitting the table.
Gastronomically yours,
Chef Margie LaPlante, Runner-Up, 2017 Minnesota State Fair Hot Dish Honorable Mention Division
Share with your friends!
Categorized in: Lunch
