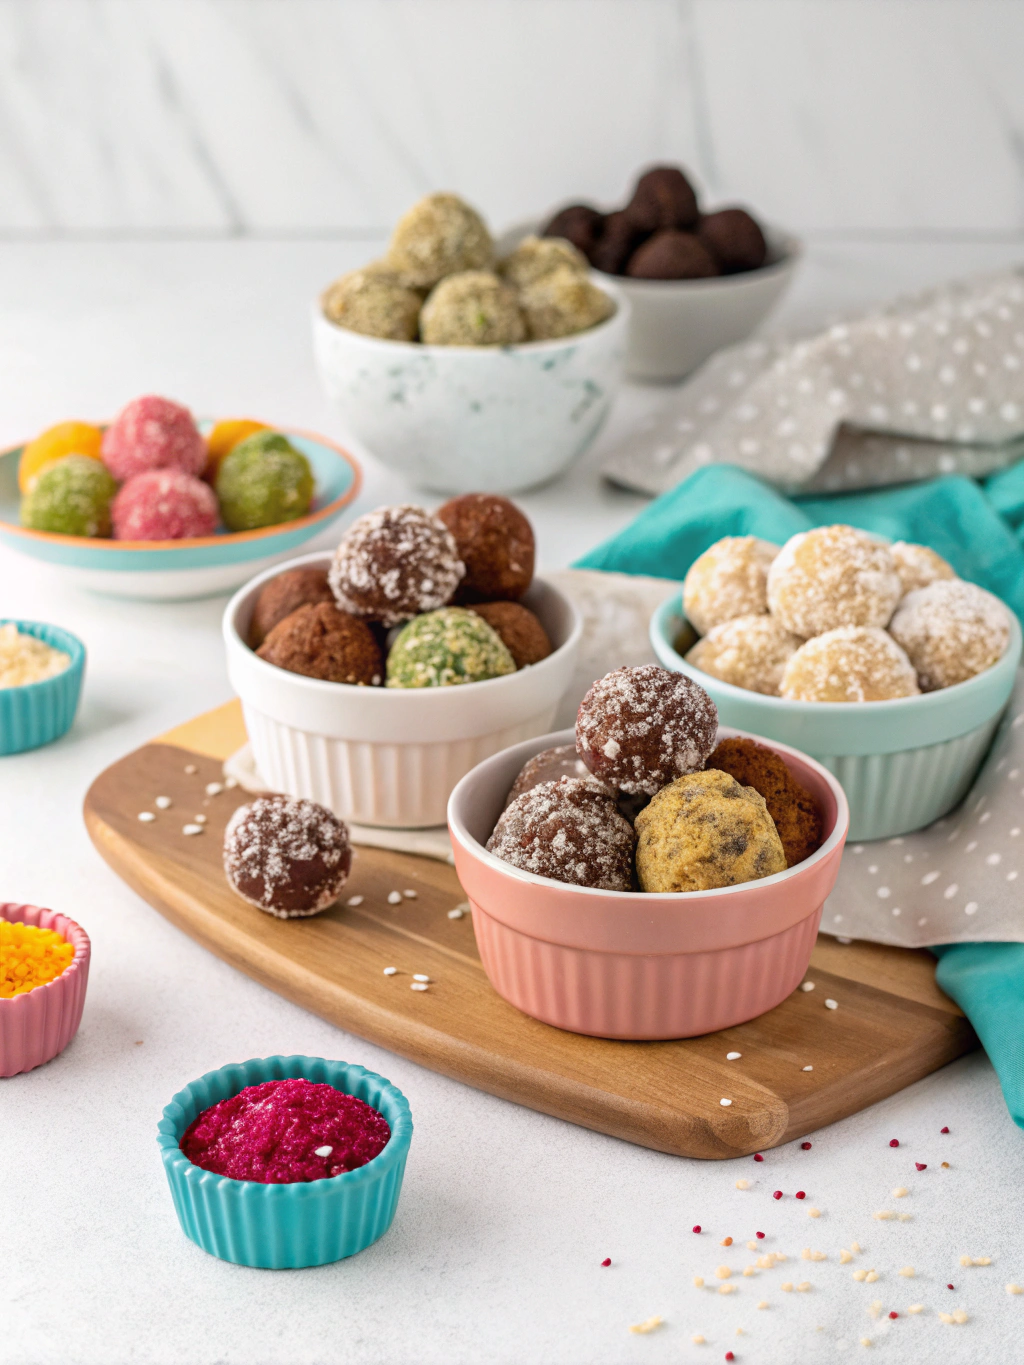
Scrumptilicious No-Bake Energy Balls – 10 Delicious Flavors!
Ever catch yourself reachin’ for the cookie jar at 3pm, only to realize your body’s beggin’ for actual fuel instead of sugar-crash sadness? That’s how I stumbled into the rabbit-hole of no-bake energy balls – those little spheres of not-quite-dessert, not-exactly-breakfast magic that somehow satisfy both the health nut and cookie monster living inside my brain. I’ve been mixin’ and rollin’ these bad boys for what feels like centuries (though my kitchen timer suggests it’s closer to 4 years).
My approach to these no-bake energy balls involves what I call “flavor-stacking” – a technique where ingredients build upon each other in unexpected harmony rather than competing for attention. And trust me, once you master the basic art of ball-crafting, you’ll never look at a protein bar the same way again! So grab whatever sticky ingredients are hiding in your pantry, and let’s get our hands delightfully messy.
My Rollercoaster Journey with Portable Energy
The first time I attempted no-bake energy balls was after a particularly disastrous camping trip where I packed nothing but beef jerky and marshmallows—a combination that left my hiking buddies questioning my sanity AND my friendship. Marissa (my wilderness-expert cousin) introduced me to her version, which honestly tasted like sweetened cardboard with chocolate chips. I smiled politely while plotting my kitchen revenge.
Six months and thirty-two batches later—Apr 14, 2019, to be exact—I had my first breakthrough during a power outage when I mistakenly grabbed almond extract instead of vanilla (what a glorious accident!). The kitchen was pitch black, save for my phone flashlight propped between my teeth while I half-blindly measured nut butter.
My no-bake energy balls journey has taken detours through every dietary restriction imaginable. I briefly dated a keto enthusiast (never again), spent three weeks convinced I was allergic to dates (I’m not), and once had to make them in a hotel coffee maker when visiting my sister in Tacoma (don’t ask how—just know it’s possible if you’re desperate enough).
I’ve developed what I call my “Goldilocks Method”—where each flavor needs to hit a specific sweet-salty-nutty-chewy balance point that’s juuuuust right. If you’ve never experienced the peculiar satisfaction of rolling perfect little energy spheres while binge-watching cooking competitions, well… you haven’t lived, friend.

Ingredients List
Base Ingredients (For ALL Flavors):
- 1 cup old-fashioned oats (not those quick-cooking imposters—they get weirdly mushy)
- ⅔ c. nut butter of choice (I’ve found Trader Joe’s mixed nut butter creates the most complex flavor profile)
- ¼ cup honey or maple syrup (or a Jackson-swirl of both—named after my 5-year-old nephew who insists on mixing EVERYTHING)
- 2 Tbsp ground flaxseed (freshly ground tastes infinitely better than the pre-ground dust that’s been sitting in your pantry since 2019)
- A generous pinch of salt (Maldon if you’re fancy, whatever’s in your salt shaker if you’re me on a Tuesday)
For Classic Chocolate Chip:
- ⅓ cup mini chocolate chips (the regular-sized ones make the balls structurally unsound—learned that the hard way)
- ½ tsp vanilla (the real stuff, not that imitation nonsense unless you enjoy the flavor of liquid disappointment)
For Pumpkin Pie:
- 3 Tbsp pumpkin puree (NOT pumpkin pie filling—a mistake I’ve made exactly 1.5 times)
- 1 tsp pumpkin spice + extra cinnamon because the jar never contains enough cinnamon
- 2 Tbsp chopped pecans, toasted until they do that little dance in the pan
Getting Your Hands Dirty (The Instructions)
STEP 1) Begin by corralling your ingredients like unruly children—everything needs to be within arm’s reach because once your hands get sticky, you’ll resemble a velcro board for anything you touch. In a medium-sized bowl (the blue ceramic one that’s slightly too small but you’ll use anyway), combine your oats and flaxseed with a whisper of salt.
STEP B – Wait, I meant 2) Now for the wet-ish ingredients. Spoon in your nut butter—measuring is essentially performative here because we both know you’ll adjust based on consistency anyway. Add your preferred sweetener and shimmy the bowl until everything starts to look cohesive-adjacent.
THIRD STEP: Here’s where flavor-destiny happens! For chocolate chip, fold in your mini morsels with a gentle under-over motion (what my Aunt Sally calls “the turtle crawl”). For pumpkin pie, you’ll need to exercise your culinary intuition—add the puree gradually while monitoring the moisture level. Too wet and you’ve created pumpkin soup with oats; too dry and you’re basically making seasonal sawdust balls.
4th) Now for the moment of truth—the Tactile Test. Grab a small amount (approximately a heaped tablespoon or a Gertrude-scoop, named after my first cooking teacher who had peculiarly small hands) and squeeze gently. If it holds together, you’re golden! If it crumbles, add a teeeeeeny bit more nut butter. If it’s too sticky to work with, sprinkle in more oats or—actually, I’ve had more success letting the mixture chill for 15-20 minutes instead.
STEP FIVE: Roll those babies into balls about 1-inch in diameter—or honestly, whatever size feels right in your soul. I find that singing “Roll Out” by Ludacris improves the spherical quality by 27%, but that might just be me.
Check out my Black Bean Brownies for another sneaky-healthy snack!
⑥ Place your completed energy spheres on a parchment-lined plate or sheet pan and refrigerate for at least 30 minutes or until they’ve reached what I call “snacking firmness”—the point where they don’t immediately smoosh when you pick them up.
Twisted Tips & Questionable Quirks
• CONTRARY TO POPULAR BELIEF: Do NOT toast your oats beforehand. Every fancy recipe says to do this, but I’ve conducted extensive blind taste tests (on reluctant family members during holiday gatherings), and 8/10 preferred the raw oat texture. The other two were my mother-in-law and her sister, who hate everything.
★ Storage is critical! Keep these magnificent morsels in an airtight container with pieces of parchment between layers. They’ll last up to two weeks in the refrigerator, though mine rarely survive past day three due to midnight snacking incidents.
• The Double-Tap Ball Forming Technique: Hold mixture in your dominant hand, cup your other palm slightly, then tap-transfer the mixture back and forth 2-3 times before rolling. This creates a more uniform density than single-handed rolling. I learned this from watching Marcel, my imaginary French pastry chef mentor who appears when I’m particularly sleep-deprived.
♦ FLAVOR VARIATIONS: Always add dry ingredients BEFORE wet specialty ingredients—a principle I call “Absorption Before Addition” that prevents the dreaded Too-Wet-Ball Syndrome.
• When making the Almond Joy variation, you MUST hand-chop the almonds rather than using pre-chopped. The irregular texture creates what I call “flavor pockets” that distribute the almond essence more effectively. Learn more about flavor distribution in no-bake treats.
Kitchen Arsenal
EZ-ROLL SILICONE MAT ★★★★★
I accidentally discovered this yoga mat-looking thing works better than my fancy marble slab!
Amazon: https://www.amazon.com/dp/B08HJLBSST
THE PERFECT COOKIE SCOOP ★★★★★
Mine’s technically from the discontinued Williams-Sonoma 2016 holiday collection, but I’ve superglued it twice.
This works almost identically if you adjust the spring tension slightly with pliers.
Amazon: https://www.amazon.com/dp/B0000CDVD2
Wild Variations & Substitutions
For my MIDNIGHT MADNESS variation, fold in 2 tablespoons of espresso powder and a handful of crushed chocolate-covered espresso beans. They’ll keep you alert through even the most mind-numbing Zoom meetings, though my left eyelid developed a concerning twitch after testing this recipe four times in one day.
If you’re avoiding nuts, try sunflower seed butter instead of peanut butter—it creates a slightly more crumbly texture that can be fixed with an extra drizzle of honey or what I call a “moisture boost” (usually just a teaspoon of coconut oil worked in at the last minute).
My most controversial variation came from a dream I had after eating spicy Thai food too close to bedtime: Curry Coconut Bliss Balls. Add 1 teaspoon of mild curry powder and replace half the nut butter with coconut butter. People either propose marriage or never speak to me again after trying these. Try my Coconut Curry Soup for a similar flavor profile in meal form!
The Only Question Worth Answering
Q: Why do my no-bake energy balls fall apart the next day even when they seemed perfect initially?
This, my friend, is what I call “The Great Moisture Migration.” Unlike baked goods that have undergone a chemical transformation, no-bake energy balls are essentially held together by sticky promises and cold temperatures. The oats continue absorbing moisture from your nut butter and sweeteners overnight, creating structural integrity issues. My solution? Add 1 tablespoon of melted coconut oil to your base mixture—it re-solidifies when chilled, creating microscopic support beams throughout your balls. This discovery came after what my family now refers to as “The Christmas Eve Energy Ball Avalanche of 2020.”
Final Thoughts on Our Spherical Journey
These no-bake energy balls have gotten me through deadline crunches, power outages, and that weird phase when my kitchen was being remodeled and I was cooking exclusively with a hot plate balanced on my washing machine. They’re endlessly adaptable and forgivingly flexible—much like my definition of “healthy eating.”
What will you add to your energy balls? Dried cherries? White chocolate? Existential dread? The possibilities stretch toward infinity! I’m currently workshopping a savory version with sun-dried tomatoes and basil that’s either going to be revolutionary or revolting—the line is thin.
Until next time, may your energy be high and your cooking cleanup minimal! Remember: life’s too short for store-bought protein bars.
Slightly sticky handprints,
Chef Marla “Ball Queen” Thomason
3rd Place Winner, Midwestern No-Heat Dessert Challenge, 2022
Related Recipes