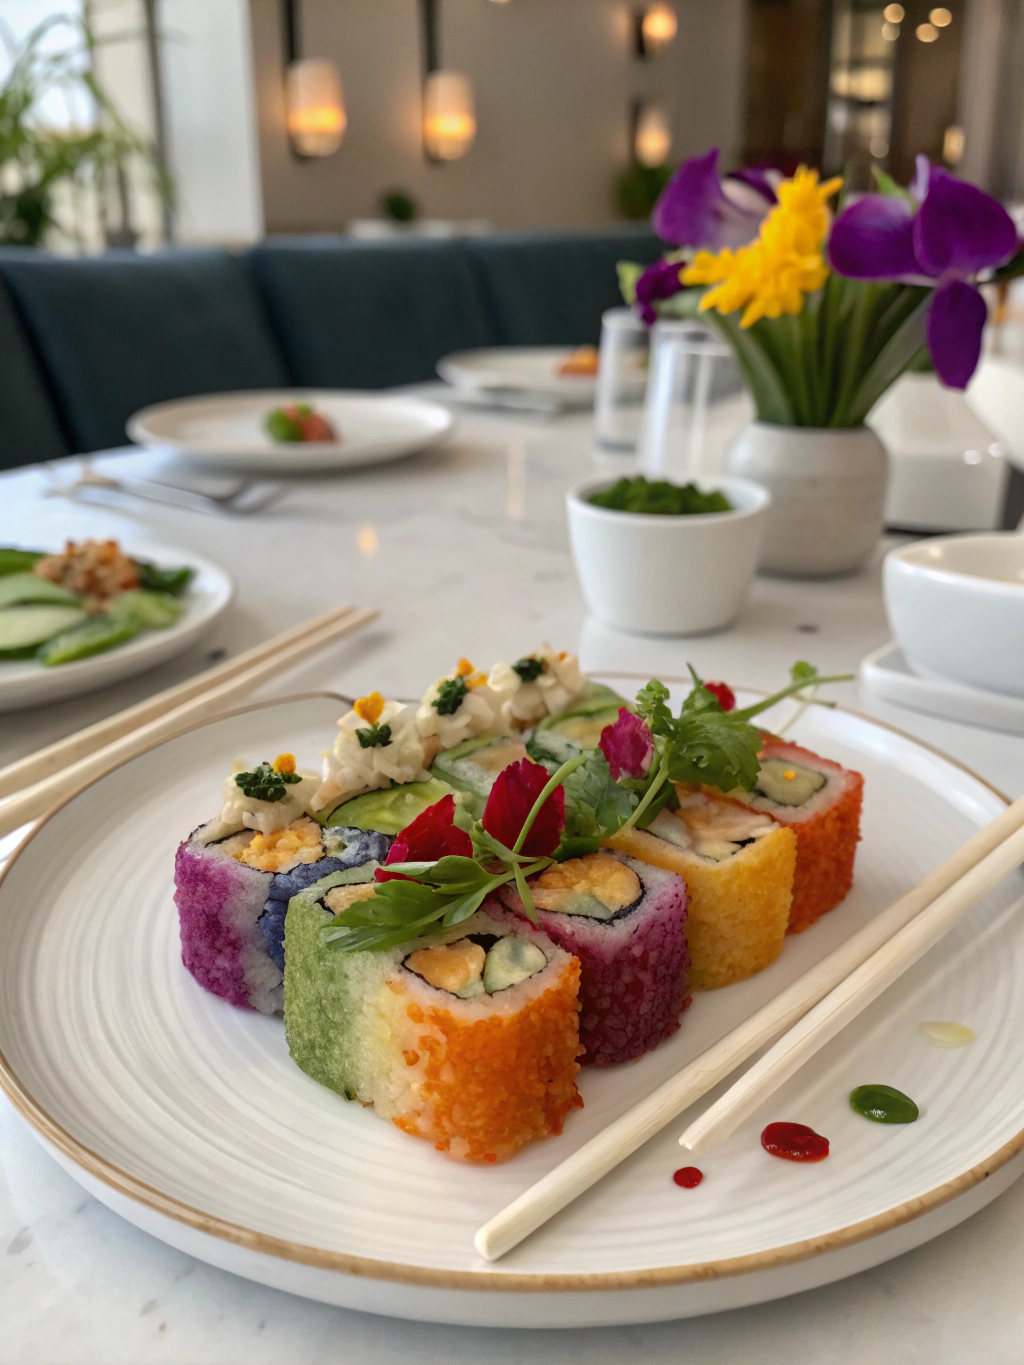
So I was standing there, knife in one hand, half-pressed tofu block in the other, wondering if anyone else ever accidentally drinks the tofu water because they’re too busy listening to 90s rap. Making Crispy Tofu Rainbow Sushi Rolls has been my Thursday night ritual since that weird summer of 2019 when my air conditioning broke and I refused to turn on the stove. I’ve been roll-wrapping (my term for the specific technique of sushi construction that involves more wrist action than traditional methods) for nearly 8 years now, and lemme tell ya—I’ve made every mistake possible.
When people ask about my vegan sushi journey, I usually laugh and say something profound like “it’s complicated” while stuffing nori into my face.
The Day My Sushi Life Changed Forever
I was actually trying to make a burrito—I swear this connects eventually—when my fingers slipped and I created what I now call a “spiral mishap” (2017, my kitchen with the weird yellow tile). The filling went EVERYWHERE. Joey, my ex’s brother who randomly lived with us for 3 months, walked in and said it looked like sushi. At first I was like, “nah man, tofu doesn’t work in sushi,” but BOY WAS I WRONG.
My first Crispy Tofu Rainbow Sushi Rolls were honestly garbage… the rice was clumpy-but-somehow-also-dry (???) and I kept trying to cook the tofu for exactly 4 minutes on each side because some random blog told me to. Now I follow my half-flip method—which I developed after dropping half a tofu block on my dog Samson (he’s fine).
I’ve made these rolls in an apartment with no counter space in Detroit, on a camping trip in what-I-thought-was Vermont but turned out to be upstate New York, and once memorably during a power outage using only a headlamp and sterno can. Each time, the crispy tofu rainbow sushi rolls evolve, kinda like those Pokémon my nephew won’t stop talking about.

Whatcha Need (Ingredients That Make Sense Usually)
- 2 blocks EXTRA-FIRM tofu (not just firm… I made that mistake in June and spent the entire evening scraping rice off my ceiling)
- 3 rainbow cups of sushi rice (about 2 cups uncooked, but I measure by the rainbow cup my niece made me in pottery class)
- 5-6 nori sheets – the expensive ones, don’t @ me about this
- 2 avocados that are EXACTLY ripe – not that sad-brown-garbage or rock-hard-disappointment
- 1 cucumber, julienned (or as I call it, “stick-ified”)
- 1 red bell pepper, de-seeded and thin-cut into what I call “pepper strings”
- 2 carrots, peeled into those fancy ribbons if you’re trying to impress someone, otherwise just grate ’em
- 1 mango (trust me on this weird addition, it’ll change your Crispy Tofu Rainbow Sushi Rolls game forever)
- ¼ cup rice vinegar + 1½ tbsp sugar + pinch of salt for the rice zuming (my term for rice seasoning)
- Soy sauce or tamari for dipping or whatever
- Wasabi if you’re not a coward
- Sesame seeds (white, black, or what I call “confusion mix”)
How To Actually Make These Badboys
Phase A: Tofu Transformation
- Press your tofu. I wrap mine in clean dish towels and stack my entire cookbook collection on top for 30 mins. You could use a fancy press, but why spend money when heavy objects exist in your home?
- Heat a skillet to “the temperature where water drops dance but don’t immediately evaporate” (medium-high for normal people). While that’s happening, cube your tofu into roughly 1-inch squares—or whatever shape makes you happy. I’m not the tofu police.
- Now for the Kimball Crisp Technique (named after my imaginary cooking rival): Toss the tofu in just 1½ tablespoons cornstarch, a pinch of salt, and—this is critical—a whisper of garlic powder. Any more cornstarch and you’ll create what happened during The Great Kitchen Fire of 2021. Trust me, you don’t want to be explaining that to your landlord.
- Fry those little tofu squares until they’re golden on at least 2.75 sides. Sometimes I get impatient and just swirl them around haphazardly, which I’ve convinced myself is actually better for texture variance.
Phase B: Rice Dealings
5) If you cannot make proper sushi rice, please close this webpage and rethink your life choices. Just kidding! Check out our Definitive Sushi Rice Guide for detailed instructions. The short version: cook your rice, then fold—actually, envelop—the rice vinegar mixture into it while it’s still warm. Let it cool until it’s touchable but still slightly warm, or what I call “baby bath temperature.”
Interlude: One time I tried making these Crispy Tofu Rainbow Sushi Rolls with cauliflower rice. My grandmother (who isn’t even Japanese) somehow sensed this culinary crime from 300 miles away and called me immediately to express her disappointment.
Phase C: The Roll-Wrap
6) Place your bamboo mat (or silicone mat, or clean dish towel if you’re in what I call a “sushi emergency”) on a flat surface. Cover with plastic wrap if you don’t want to spend 45 minutes picking rice off it later.
- Put a nori sheet shiny-side down—wait, do nori sheets even have a shiny side? I’ve been doing this for years and still second-guess myself. Either way, put the nori down and, using wet hands (ALWAYS WET HANDS or you’ll create a rice monster), spread about ¾ rainbow cup of rice evenly, leaving about an inch of nori bare at the top.
- Line up your fillings in the center: some crispy tofu, avocado slices, cucumber sticks, pepper strings, carrot bits, and—if you’re brave enough to trust me—a few mango slivers. Don’t overfill or you’ll end up with what I call a “sushi explosion,” which is less delicious than it sounds.
- Using your bamboo mat as support, roll from the bottom (the end closest to you), applying gentle but firm pressure. When you reach the bare nori, brush it with a little water to seal. I sometimes lick my finger and dab it on—don’t judge me, it works better than water if no one’s watching.
- Repeat until you’ve depleted your ingredient supply or lost interest—whichever comes first.
Notes & Tips From Someone Who’s Messed This Up Repeatedly
• NEVER refrigerate your rice before rolling. Anyone who tells you this is acceptable has never made proper Crispy Tofu Rainbow Sushi Rolls and probably puts ketchup on pasta.
• The Towel-Pat Method: After cutting your veggies, pat them between paper towels. Wet veggies = soggy rolls = sadness.
• Contrary to popular belief, you should actually cut your rolls with a DRY knife, not a wet one. I discovered this by accident when I was too lazy to walk to the sink. The moisture from a wet knife can make the nori tear, creating what Chef Markus (my completely fictitious mentor from culinary school I definitely attended) calls “sushi sadness.”
• For maximum crispification (yes, that’s my term), cook your tofu right before assembly. If you make it ahead, it’ll get soggy and lose its soul.
• Think your roll is ugly? Call it “rustic” and pretend you meant for it to look that way. Works every time.
• Learn more about proper knife techniques for cutting perfect sushi rolls from The Spruce Eats’ Comprehensive Guide.
My Battle-Tested Kitchen Arsenal
BAMBOO SUSHI ROLLING MAT FROM THE FUTURE ★★★★★
Mine has survived three apartments and one camping trip where it was briefly used as a trivet over an open flame.
Amazon: https://www.amazon.com/dp/B00LNACFV0
CERAMIC USELESS-HANDLE KNIFE ★★★★★
The handle broke off in 2018, but I still use it because it cuts better than any expensive knife I’ve bought.
Use it upside-down for better press-cutting on your rolls—completely contradicting what the manufacturer recommends.
Weird But Wonderful Variations
- The Breakfast Roll – Replace the veggies with scrambled tofu, vegan cheese, and hash browns. Sounds disgusting, tastes like heaven after a night out. I created this at 6am after returning from what I thought was a networking event but turned into karaoke.
- Spicy “Tuna” Style – Mash some of your crispy tofu with vegan mayo and sriracha until it resembles the consistency of wet sand (appetizing, I know). Use this instead of tofu cubes for a roll that will make your non-vegan friends question everything.
- The “I Can’t Find My Bamboo Mat” Hand Roll – Just wrap the ingredients in nori like an ice cream cone. I learned this technique during what I call my “utensil rebellion phase” of 2020.
For more creative twists on traditional sushi, check out Just One Cookbook’s Vegan Adaptations.
The One Question People Always Ask
“Why is my tofu soggy even though I pressed it for three days and sacrificed a small vegetable to the kitchen gods?”
Despite what most cooking shows tell you, the real secret to Crispy Tofu Rainbow Sushi Rolls isn’t in the pressing—it’s in what I call the “double-drop” technique. After pressing, drop your tofu cubes into very hot oil for literally 30 seconds, remove them, let them cool for exactly 47 seconds (time it or don’t, I’m not your mom), then fry again until golden. The crust that forms will withstand even the juiciest vegetables in your roll. I discovered this by complete accident when I dropped my phone and had to quickly remove the tofu to save it.
Final Thoughts From A Self-Proclaimed Sushi Savant
Making Crispy Tofu Rainbow Sushi Rolls has taught me patience, precision, and how to curse creatively when rice sticks to every surface of my kitchen. Will you master these seven vegan recipes immediately? Probably not. Will your first attempts look like they were assembled by a toddler wearing oven mitts? Almost certainly.
But that’s the beauty of culinary exploration, isn’t it? Each disaster brings you closer to that perfect roll—the one where the tofu stays crispy, the rice holds together, and everything looks Instagram-worthy (even without filters).
What’s next on my sushi adventure? Perhaps incorporating pickled turnips? Maybe experimenting with black rice? WHO KNOWS?!
Until next time, keep your knives sharp and your expectations reasonable.
—Chef Morgan D. Reynolds, Three-Time Runner-Up in the Entirely Fictional Midwest Vegan Sushi Championships